I am starting this blog series about Service Meshes taking Istio, the most stable and production ready, as an example throughout the rest of the series but let’s start first by what is actually a service mesh and we dig deep into core functionalities and benefetis of using it and how to implement it from there.
What is a Service Mesh?
It’s an abstraction of the communication layer between software components transforming it into a separate entity. Thus, it allows altering the communication between the various components without having to change application configuration or new rollouts.
Unlike the common understanding and cliché around service mesh, they are not coupled with Containers ,Microservices nor Kubernetes. Actually a service mesh is an architectural pattern that’s valid for distributed systems whether running on k8s or not.
Let’s try to understand better this fancy definition by looking at this simple architecture
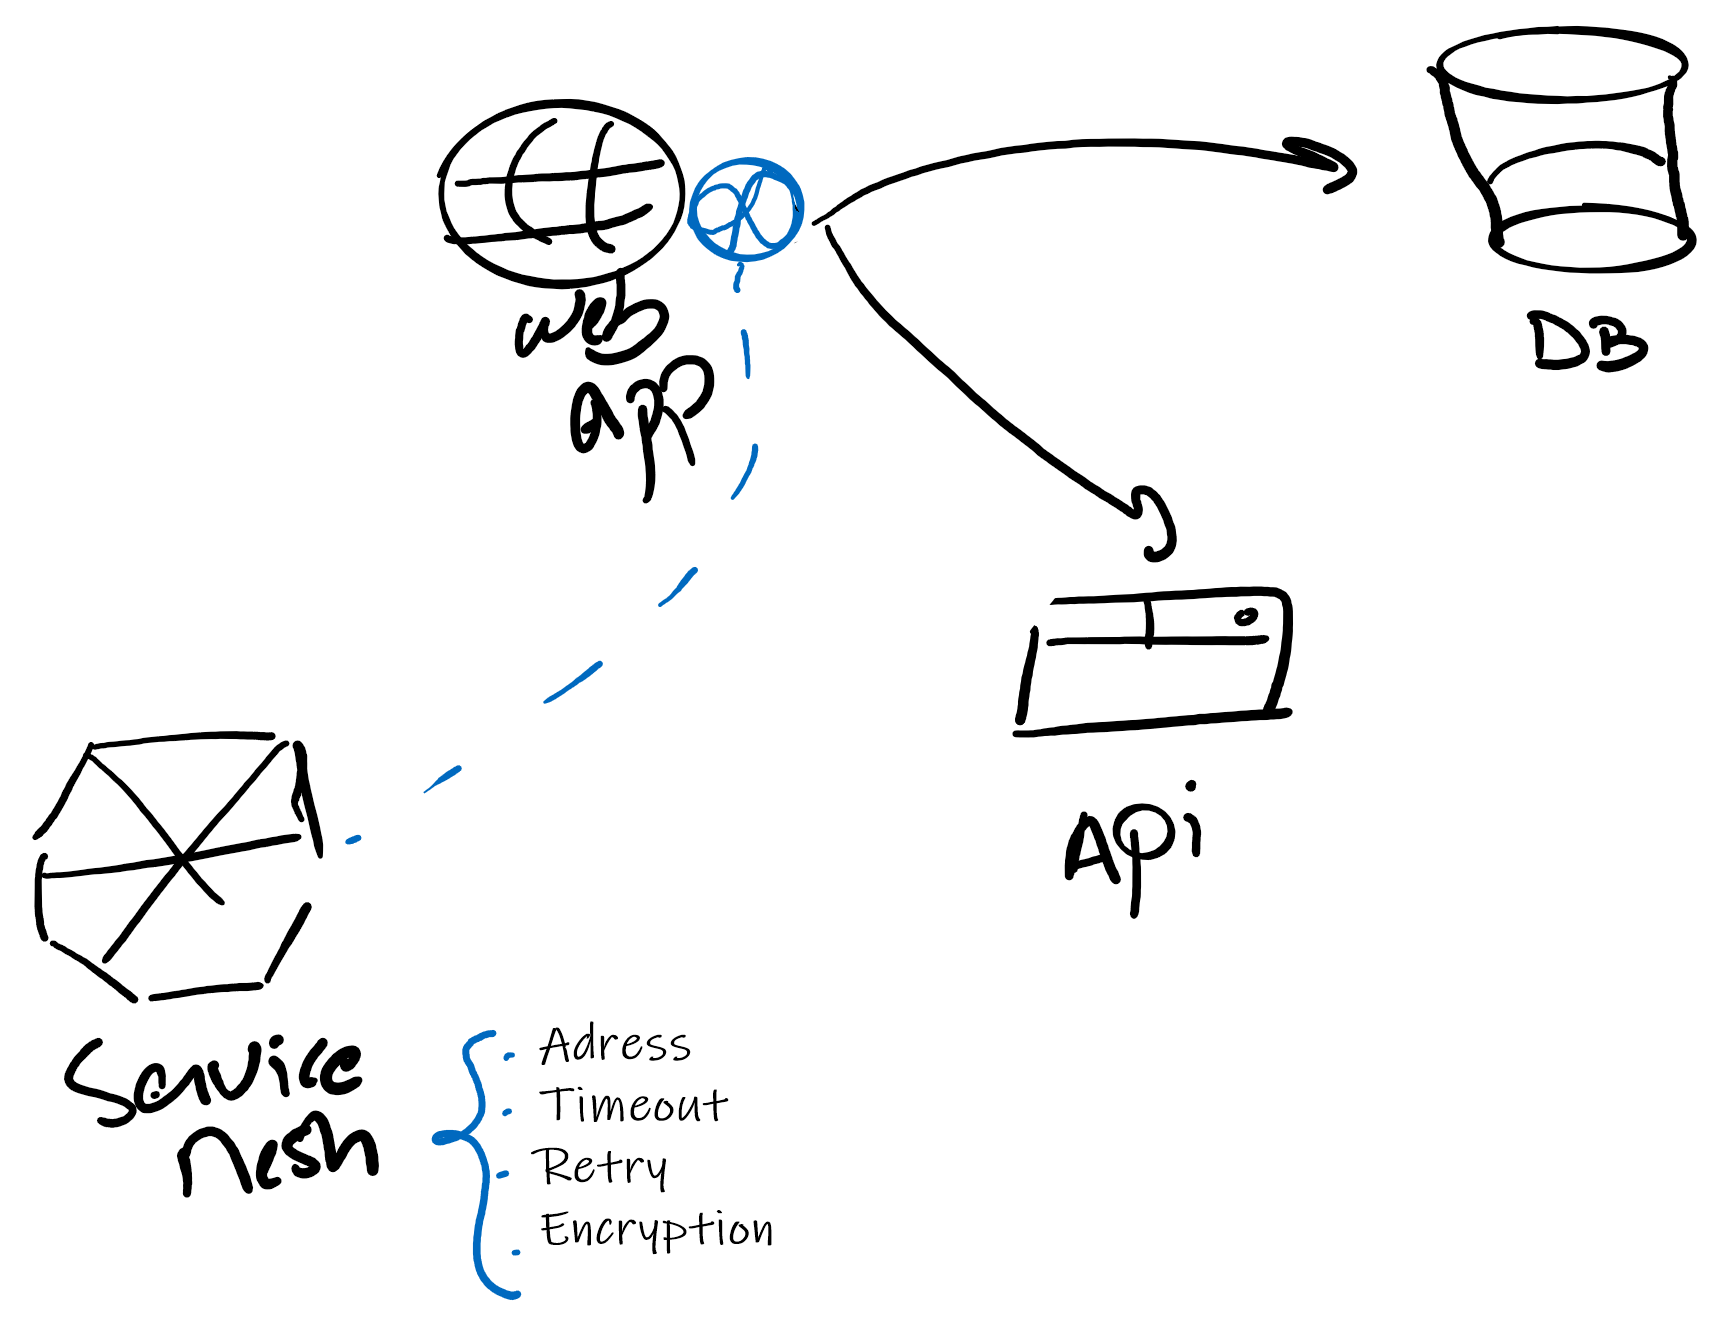
The main idea is that the service mesh, when configured alongside the application components, will inject a network proxy once the application is registered with the mesh. In our case anytime the WebApp sends traffic either to the DB or the API it will go through the proxy and it will apply the rules that we defined in our service mesh.
So, instead of configuring the service addresses, timeout, retry policies and so on in the webapp component it’s now centralized and managed by the service mesh. Moreover, the traffic encryption comes as a bonus for all components communicating through the mesh by the mean of certificates issued for all registered components ensuring mTLS.
Do you need a Service Mesh?
As for every emerging technology, it really depends on the value that it will bring to your solution and at what cost. So let’s have a look at the Pros and Cons of Istio, under the Pros section we have three main categories:
- Traffic Management is the core functionality, the full control over the communication layer allows
- Discovery and Routing
- Load balancing
- Failure handling : Retry policy, Circuit breaker
- Security Istio creates certificates foreach registred component enabling
- mTLS : the servers have certificates for encryption and clients have certificates to validate the identity of the server.
- Authentication : every component has a known identity managed by Istio.
- Authorization : Allow/Deny communication between components and could be extended to end users.
- Observability
- Monitoring
- Tracing
- Visualization
On the other hand it’s very important to keep in mind that service meshes in general, Istio in our case, are a big cpu and memory consumers so it adds up quite a sum to your total infrastructure cost. Check out this analysis done by Michael Kipper (Senior Production Engineer @ Shopify) for more insights about CPU consumption.
Istio under the hood
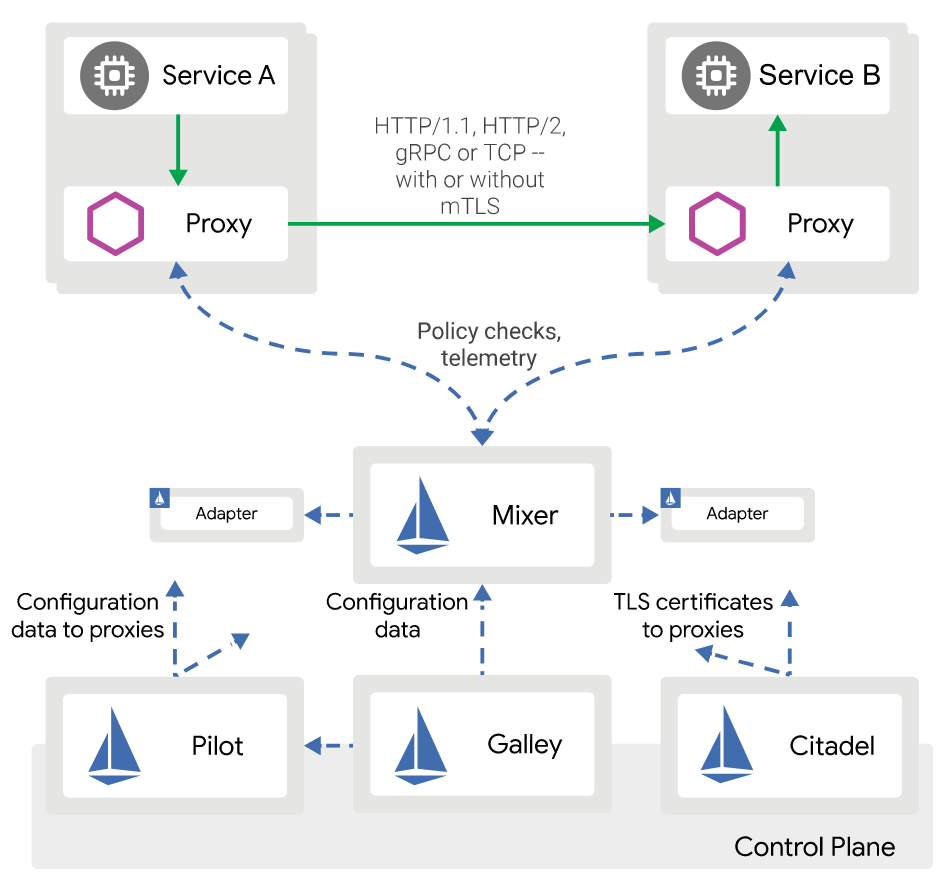
If we take a step back and remove the mesh from the picture, Service A will communicate directly with Service B, however with Istio onboard we see the new model of communication through the envoy proxy running as a side car in the same pod. Istio is relying on three control plane components :
- Pilot Push the latest mesh configuration to the proxies.
- Mixer Is the masterpiece, It’s the runtime components that applies policies and collect telemetries.
- Citadel Issue certificates to the registered components.
Hands on, Finally!
Istio can be setup in so many different ways, you can apply the yaml files, use istioctl or Helm which i recommend for production environment. The setup is exhaustivelly shown in the home page, What i wanted actually to highlight is how Istio detects automatically new services and register them to the mesh.
kubectl label namespace default istio-injection=enabled
once the namespace is labeled, Istio injects automatically Envoy side car proxies. So we have Istio up and running, Let’s check one of the custom Istio resources that plays a major role in handling the traffic
Virtual Services
In simple words, They are a set of routing rules that get’s invoked when a host is addressed. The is a basic example that will intercept the traffic going to “my-host” and redirect to the same host however through the Istio network.
apiVersion: networking.istio.io/v1alpha3
kind: VirtualService
metadata:
  name: my-virtualservice
spec:
  hosts:
  - my-host     #The host required by the client
  http:         #Routing for Http
    route:
    - destination:
        host: my-host    #The destination routed by Istio
This capability opens the door to some key traffic management oppurtunity like adding fault tolerance, Canary deployments, Blue/Green deployments.. in this first part of the series i am going to address fault tolerance and treat the rest in the next blog post
Fault Tolerance
Resilency is key to microservices, so it’s really important to take into consideration client timeouts and retry policies. Istio allows us to do this using the virtual service concept saving the troubles of implementing those policies for each microservice seperately
apiVersion: networking.istio.io/v1alpha3
kind: VirtualService
metadata:
  name: my-virtualservice
spec:
  hosts:
  - my-host
  http:
  - route:
    - destination:
        host: my-host
    timeout: 10s
    retries:
      attempts: 2
      perTryTimeout: 5s #Timout between retries
      retryOn: 5xx #Retries only if 5xx server error raised
Coming up
Now that we covered the basic understanding of service meshes and took a deeper look into Istio, in the next chapter, we will tackle some advanced topics like service traffic management, mTLS, distributed tracing and finish the series up with running Istio in production environments.